 |
Morrowind Weapon Export Tutorial
|
 |
|
Morrowind Weapon Export Tutorial
|
|
Please give this page time to load, it is quite image
intensive.
If you have any queries about this tutorial, or anything about MAX
or Morrowind modding in general, please drop me an email. My address is on my contact page.
I will try and help as best I can.
Last update on 16 June 2002 13:13
v0.5 - Almost complete, still need to add information on shininess mapping.
For other plugins and tutorials, go back to my Morrowind page.
This is a tutorial designed to help you import your own weapon models and textures in The Elder Scrolls 3: Morrowind. This tutorial uses 3D Studio Max version 4, and the free NIF exporter used in Irrational Games' Superhero strategy game "Freedom Force".
Before you do anything, grab and install the Freedom Force NIF exporter. Get it Here.
Ok, let's begin.
The model
Before we begin, you will need to make a model. Mesh modeling a sword or another weapon is beyond the scope of this tutorial, so I'll just cover what you need to do to prepare a model you've already made for Morrowind.
You need a nice clean mesh, without an absurd face count. A couple of hundred polygons should be fine, try not to go over 400. For a normal sword you shouldn't need huge numbers of polygons anyway; most of the detail work should be in the textures.
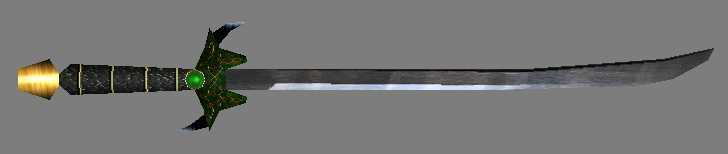
This is the model I am going to use. It is part of a mod I'm doing for Morrowind, and this is one of the ceremonial weapons used by one of the new factions in my mod. I call it a Jaded Longsword, since it incorporates lots of green bits. The textures aren't finished yet, but it already looks good in-game.
Ok, so we have a model. Lets get it ready to export. The first thing we need to do is make sure that the mesh is free from any modifiers that are applied to is, such as Smooth or Edit Mesh. Got to the modify panel and right-click on the modifier stack. Select 'collapse all' and confirm the command. Your modifier stack will collapse leaving you with a normal editable mesh. Make sure you save your mesh before you do this in case you need to go back and change the modifiers at some point.
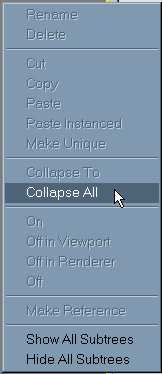
The Collapse all option on the stack.
Next we have to make sure that the model is properly aligned and scaled.
Alignment is determined by three things: Position, Rotation, and Scale. All three need to be correct for Morrowind to display your weapon correctly.
Position: The pivot point of the mesh needs to in the correct position for the model to sit properly in your character's hand. Go into the Hierarchy panel and select 'Affect Pivot Only', then move the mesh's pivot point to where the character's hand should be. I place mine about 2/3rds of the way up the hilt of the sword.
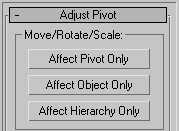
Here's what the Pivot rollout looks like on the Hierarchy panel.
Rotation: Weapon models in Morrowind also need to be aligned a certain way. Looking at your 'top' viewport, the weapon should be facing up, with the bladed edge facing to the right.
Scale: A normal human in Morrowind is 128 MAX units tall. This is about 6 feet, so a 3 foot sword should be about 64 MAX units long.
To move, rotate and scale the model properly, use an XForm modifier. First move your pivot point to a point on the weapon's handle as described above, then apply XForm.
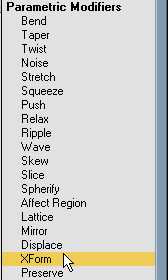
This is where you'll find XForm on the modifiers pull down box. It's a parametric modifier.
Using the XForm gizmo, rotate your model so it is aligned correctly, then move it so that the mesh is at 0,0,0 in the world. Finally, Uniform-scale the mesh so it is the correct size in MAX units.
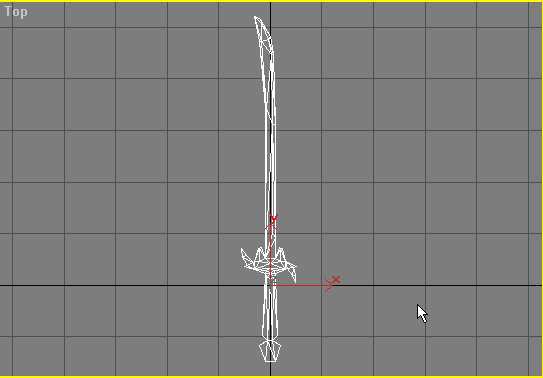
The mesh, correctly aligned in the top viewport, with the pivot where the hand will hold the weapon.
When you have done all this, collapse your modifier stack again to get rid of the XForm. Then go into the hierarchy panel and select 'reset transform' and 'reset scale', then go into the Utilities panel and select 'Reset Selected' on the Reset XForm tool. This will ensure that MAX totally resets the transform history of your object. It is now a clean, collapsed mesh that is the correct size, correctly aligned and in the correct position to be imported into Morrowind.
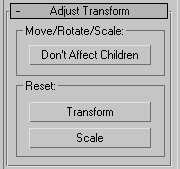
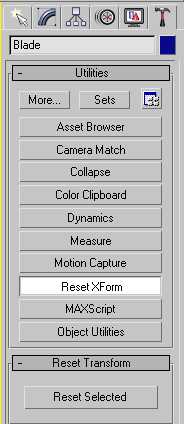
These are the two panels you are looking for, one under Hierarchy, the other under Utilities.
Select your mesh, and go into the file panel and select 'save selected'. Save your mesh out to a new file. using 'Save Selected' means that you will save only your mesh instead of the whole scene, in case there was a light, a camera, or something else you don't want to keep that you forgot about. You only want to save your mesh.
Texturing
So, you have a clean model that is all ready to be imported. If you want to see you model RIGHT NOW you can skip this section and go down to the exporting section. This will let you see your model in the game, even though it'll be ugly and untextured. :)
For those of you with a bit more ambition, lets move on to texturing your weapon.
The model format that Morrowind uses is really quite nice. NIF models can use multiple texture files, which makes things a bit easier if you want to reuse textures and also makes things easier when you're dealing with the Material in 3DSMAX.
The first thing you need to do is break up your weapon into individual pieces that you want to texture. Think about how 3DSMAX does it's texture mapping...You'll be using UVW mapping so break up your model into pieces that can be easily textured using planar, cylinder or sphere mapping.
To break the model up, go into the sub-object level of Editable mesh. Go into the face sub-object level. Select the faces you wish to break off, and then choose 'detach' from the rollout. Name your new piece, and then continue doing the rest of the pieces. You should now have a bunch of separate objects. Don't move them! You'll have to reattach them later, so keep them where they are.
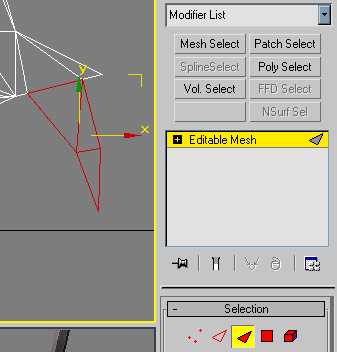
Modifying the face sub-objects, here part of the guard is selected and ready to be detached.
Here is how I broke down my model:
Next, apply a UVW map to each piece. Make sure you get the gizmos all lined up properly.
Now, draw your textures! You can use a 3DSMAX plugin like texporter to get a template to draw on, or you can just take screen captures of your viewports and draw over them if you're using mainly planar maps. Make sure you save your textures in Window Bitmap (BMP) or Truevision Targa (TGA) format. Also ensure that they are completely square, and that their size is in a multiple of a power of 2. Use 64 x 64, 128 x 128, or 256 x 256. This will ensure that your textures are like those in Morrowind. The engine won't be pleased if you start using 4000 x 4000 weapon bitmaps!
Now, to apply them. Go into the Material Editor and make a plain standard material. Make 1 for every piece of your model. Now go into maps and put a bitmap in the diffuse slot of each material. Use the textures you drew, then apply each material to the appropriate part of the mesh. You should have a nicely texture weapon in your shaded viewport now.
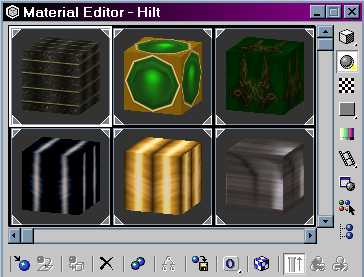
My six standard materials in the Material Editor.
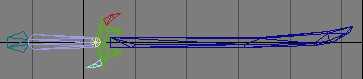
My sword in the shaded viewport, after textures were applied.
Now you need to put your model back together. Select a piece of the model, and make sure you're NOT in sub object mode. Scroll down the rollout in the modify panel and find 'attach'. Click attach, then click on another part of your model. This will put the pieces of your model back together. A dialog will appear asking you what to do with the materials. Select 'blah' and make sure that the checkbox marked 'condense' is checked. This will join the objects together, and also compile the materials into a new Multi-Sub Object Material. Repeat this for all the pieces of the mesh.
Almost done. Although you have attached the mesh pieces, they are still separate sub-objects. You need to weld the vertices back together to fuse the pieces into a whole again. Go into vertex mode and drag a box around all your verticies. Now scroll down the rollout and find the 'weld' section. Set the threshold to 0.1 and then hit weld. Nothing visible should happen...but that's Ok. MAX has welded the vertices, it just doesn't tell you with a message or anything. Hit weld again, you should get an error message saying that there are no verticies to weld. This is good; it means MAX did it right the first time.
Now, collapse the stack again like you did when you were preparing the mesh. You now have a clean, collapsed model, with a single multi material that defines it's textures. That's all the exporter needs, so your model is ready! Save it to a new file.
Exporting
Ok, so you're ready to Export from MAX to NIF.
Load up your textured mesh, and then go to the file menu. Choose Export.
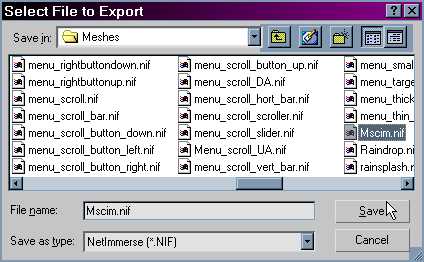
The export file dialog.
A file dialog should appear. Go to the file pull down box and find
the NetImmerse file format. (.NIF)
Now find your Morrowind folder and go into
Data Files\Textures. Name your new NIF something meaningful, and save it
here.
Now the Netimmerse exporter options appear:

The NetImmerse exporter options.
Uncheck Cameras and Lights. You're exporting a weapon, so you don't need those.
Make sure that the materials options are set to "Use Original Images" so that the Exporter doesn't pack all the textures into the NIF. All of Morrowind's textures are stored separate from the mesh, so you should do the same.
Leave everything else at its default. Then click Ok.
That's it! The mesh is now in the correct format!
Before you quit 3DSMAX, do one more thing. Render a tiny 32 x 32
image of your weapon against a black background, and save it as a 32-bit TGA
image. (So that the background is transparent)
This will be your inventory
icon. Pop it into your Icons folder in the Data Files folder.
On to the construction set!
Working in TESCS
Ok, so now you're ready to get your new sword working in the game.
Load up the construction set.
Open a new file, and double-click on the
Morrowind.esm file to set it as the master file. Click Ok. Now wait a bit while
the construction set loads up all of the resources in Morrowind.
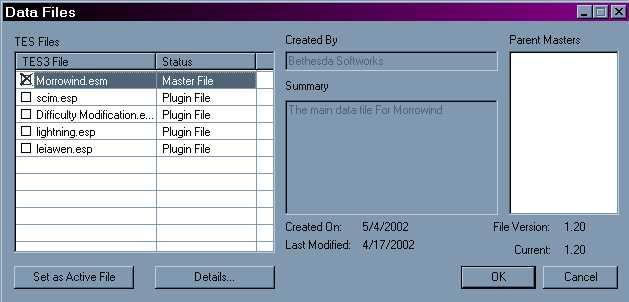
This is where you load your Morrowind files into the Editor.
Now go into the Object Window, and go into the weapon tab. Right click anywhere in the object window and select 'new' to create a new weapon. This window should appear:
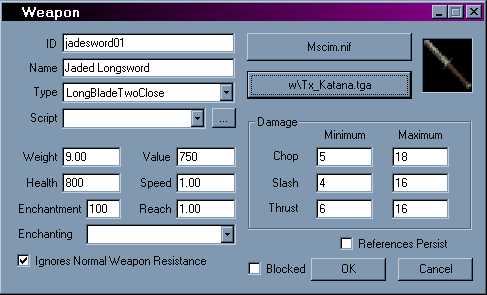
The Weapon Settings in TESCS.
Here's what it all means:
ID is the unique identity that Morrowind uses to identify your object. Something like "my_sword01" would be appropriate here. Use something you'll remember.
Name is what the player sees when they grab the weapon. This is the weapon's "proper" name. "Longsword of Pointy Sharpness" would be appropriate here, for example.
Type determines the type of the weapon, be it 1-handed longblade, axe, short blade...whatever. My longsword is two handed, because I think it looks cooler.
Script attaches a Morrowind script to your item. Scripts can be very easy or very complicated. A good example of a script is giving the player a message whenever he/she equips the weapon. 99% of weapons don't have a script, so you'll probably leave this blank.
Weight and Value are self explanatory.
Health is how much damage your weapon can take before it breaks.
Speed determines how fast your weapon swings. 1.00 is default. A value of 2.00 is twice as fast, and a value of 0.5 is half as fast. So, for all you budding Drizzt Do'Urden wannabes out there, you can set your weapons up to swing super-super quick.
Enchantment determines how many enchantment points this object has, if you want to make a magical one at an Enchanter.
Reach determines how far out the weapon extends in terms of collisions. Note that the model itself has no impact on this, so even if you make a really huge sword in 3DSMAX, it'll still have the same reach as a normal sword unless you make this figure higher.
Enchanting lets you put a spell effect on the sword, meaning it'll be magical as soon as you put it in the game.
Ignores Normal Weapon Resistance is for weapons that affect higher level creatures like Daedra. If you ever tried to hit a Daedra with an iron weapon, you know that it won't affect it at all. That's what this check box is for. Most weapons that are better quality than silver should have this checked, as should most enchanted weapons.
Damage ranges are fairly self explanatory. Put the minimum and maximum damage ranges for each attack type in the boxes provided.
The other 2 important buttons are the 'Add Art File' and 'Inventory
Image' buttons.
Click on 'add art file' to bring up a file dialog.
Find the NIF file you exported from 3DSMAX and pick it.
Click on
'inventory image' and pick the Inventory Icon you rendered earlier.
Set all the options as you want them. My weapon isn't that great; I don't want it to be uber, I just wanted it to have unique art. You can see the options I chose in the above screenshot.
Now you have a weapon ready to be placed in the world.
Ok, go to the Cell View window. Scroll down until you find Seyda Neen. Double click on the first Census and Excise office cell. This will load the cell so you can see it in the Render Window. Use the middle mouse button to pan around, and the mouse-wheel to zoom in. It might be quite dark, so hit the A key to brighten all the lights up. Holding down shift and moving the mouse will let you rotate around, so look around and find the table where you find the dagger during character generation.
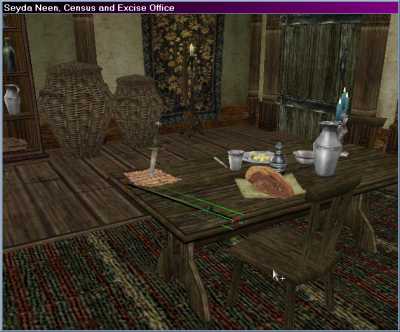
This is roughly where I put the weapon, for testing.
When you have found the table, go back to the object window and
find your new weapon.
When you have found the weapon ID on the list, drag the
name of the weapon into the render window.
You weapon should appear in the render window, fully textured and ready to go.
Check it's the right size and looks Ok. When I first imported my sword, it was 10 times too big. It dominated the whole room, and looked rather amusing when my character was holding it. If you find something wrong, edit it in MAX, then re-collapse the mesh and re-export.
Click and drag on the weapon to move it around. To move the weapon up and down, click and drag the weapon whlst holding the Z key. To rotate the weapon, click and drag with the right-mouse button.
Position your weapon above the table. Now hit the F key and the weapon will fall onto the table. Check that it looks Ok on the table and it isn't sitting on a plate or something silly.
Now, go to the file menu and save the plugin you just made. Name it something appropriate, like 'Mysword.esp'
Quit the Construction Set, and load up the Morrowind menu. Instead of hitting 'Play', Make sure you hit 'Data Files' first. This will give you a list of your plugins. Make sure you check the box next to your plugin, or it won't load.
Run Morrowind.
You should notice your plugin gets loaded along with the rest of the data files.
Make a new character...walk into the room in the Office, and your weapon should be on the table. Pick it up and give it a try outside on some mudcrabs. :)

My sword, as seen in-game.
That's it! You've just made a new mod with 100% brand new content! Congratulations!
All pages and artwork (c) Martin D. Jordan, 2002. No duplication permitted without permission from the author.